

👉 Public Registry:
To create a public Docker registry, you can use Docker Hub, which is the default public registry provided by Docker. Here’s how you can create a public repository on Docker Hub and push images to it:
Sign Up/Login to Docker Hub:
If you don’t already have a Docker Hub account, sign up at Docker Hub.
If you have an account, log in to Docker Hub.
You can use your Google or GitHub account to authenticate.
Create a Repository:
Once logged in, navigate to your Docker Hub account dashboard.
Select the Create repository button in the top-right corner.
Select your namespace (most likely your username) and enter
docker-repoas the repository name.dock
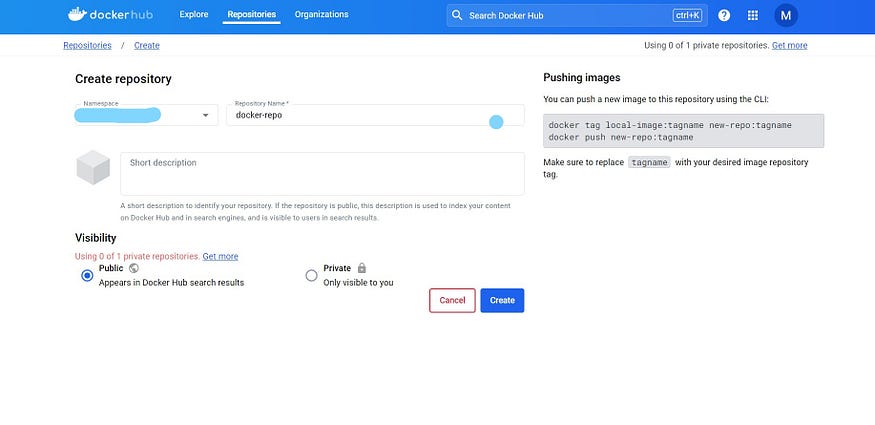
Set the visibility to Public.
Select the Create button to create the repository.
That’s it. You’ve successfully created your first repository. 🎉
This repository is empty right now. You’ll now fix this by pushing an image to it.
Verify Repository :
After creating the repository, you’ll be redirected to the repository’s page on Docker Hub.
The URL for your repository will be in the format
https://hub.docker.com/r/<your-docker-hub-username>/docker-repo.You can verify that the repository has been created and is set to public access.
👉 Private Registry:
Docker provides its own image named registry for this purpose. We need to pull this image and run a container using this image.
localhost:~$ docker container run -d -p 5000:5000 --name my_registry registry
e3835d2ab35d7883f84db1c65cf6e7ef5b4e1a85cdd1e63bc452ee379f56fdee
-druns the container in detached mode (in the background).-p 5000:5000maps port5000on the host to port5000in the container. This is the default port used by the Docker Registry.--name my-registryassigns the namemy-registryto the container.registryspecifies the Docker image (registry) to use for the container.
In the above command, we are running the container using the registry image, we have provided a name for the container and a port. By default it listens on port 5000 and also we have not assigned any volume in this command, a volume will be created automatically by default.
Verify Container Status:
After running the container, you can verify its status by using the docker container ls command:
localhost:~$ docker container ls

CONTAINER ID   IMAGE      COMMAND                  CREATED          STATUS          PORTS                    NAMES
e3835d2ab35d   registry   "/entrypoint.sh /etc…"   11 seconds ago   Up 10 seconds   0.0.0.0:5000->5000/tcp   my_registry

localhost:~$
This command lists all running Docker containers. You should see the my-registry container listed.
Access the Docker Registry (Optional):
If you want to access the Docker Registry running in the container, you can use tools like
curlor Docker CLI commands.For example, you can check if the registry is running by using
curl:
localhost:~$ curl http://localhost:5000/v2/_catalog
{"repositories":[]}
localhost:~$
This command sends a GET request to the Docker Registry’s API endpoint (/v2/) to verify its availability.
As you can see,there is no image present currently. Now we will add an image to this registry.
First let us inspect our container and check the volume attached to our container.
Inspect the Docker Container:
Use the docker inspect command followed by the container name (my-registry in this case) to inspect the container:
localhost:~$ docker inspect my-registry

# few lines removed from output
 "Mounts": [
            {
                "Type": "volume",
                "Name": "e37eda0e6eab78298f050ea5b6abffec94cb49c59c87f6edb8d7aaad470fae70",
                "Source": "/var/lib/docker/volumes/e37eda0e6eab78298f050ea5b6abffec94cb49c59c87f6edb8d7aaad470fae70/_data",
                "Destination": "/var/lib/registry",
                "Driver": "local",
                "Mode": "",
                "RW": true,
                "Propagation": ""
            }
        ],
# few lines removed from output
We can see the output of the inspect command and find the volume information in the format shown in the above output.
In case if our container stops by any chance and we want to run the container again then we can attach the same volume to the container using the above volume information.
Also notice that the driver in the above volume information is ‘local’ because our data will be stored on the local file system, there are also drivers available for remote cloud storage as well which we can use to store our data remotely such as AWS S3, Google Cloud, Azure etc.
Now coming back to pushing an image to the local registry.
localhost:~$ docker image ls
REPOSITORY   TAG       IMAGE ID       CREATED        SIZE
ubuntu       latest    1318b700e415   7 days ago     72.8MB
redis        latest    aa4d65e670d6   11 days ago    105MB
registry     latest    1fd8e1b0bb7e   3 months ago   26.2MB
localhost:~$
We will be pushing the redis image to the local registry.
Tag the Redis Image with Registry URL:
Tag the Redis image with the URL of your local Docker Registry (localhost:5000 by default)
localhost:~$ docker tag redis:latest localhost:5000/redis:latest
As seen in the below image our image with the local registry tag is created.
localhost:~$ docker image ls
REPOSITORY             TAG       IMAGE ID       CREATED        SIZE
ubuntu                 latest    1318b700e415   7 days ago     72.8MB
localhost:5000/redis   latest    aa4d65e670d6   11 days ago    105MB
redis                  latest    aa4d65e670d6   11 days ago    105MB
registry               latest    1fd8e1b0bb7e   3 months ago   26.2MB
Push the Tagged Redis Image to Local Registry:
localhost:~$ docker push localhost:5000/redis:latest
Using default tag: latest
The push refers to repository [localhost:5000/redis]
262de04acb7e: Pushed
45f6df634253: Pushed
e46136075591: Pushed
11f991845040: Pushed
dd1ebb1f5319: Pushed
814bff734324: Pushed
latest: digest: sha256:1bd57e1a42b99ae53412b582784d0362fa8205243ce5f289cb4f76de2907cb97 size: 1574
localhost:~$
The image is pushed. Now let’s verify if the image is pushed successfully or not. For verifying, curl to http://localhost:5000/v2_catalog, we see that our image has been pushed successfully.
localhost:~$ curl http://localhost:5000/v2/_catalog
{"repositories":["redis"]}
Delete the Redis Image:
Once you’ve identified the Redis image, use the docker image rm command to delete it.
localhost$ docker image ls
REPOSITORY             TAG       IMAGE ID       CREATED        SIZE
ubuntu                 latest    1318b700e415   7 days ago     72.8MB
localhost:5000/redis   latest    aa4d65e670d6   11 days ago    105MB
redis                  latest    aa4d65e670d6   11 days ago    105MB
registry               latest    1fd8e1b0bb7e   3 months ago   26.2MB

localhost:~$ docker image rm localhost:5000/redis:latest redis:latest
If we disconnect our internet and try to pull the same image again, we get the error as the default registry is unreachable.
But we are able to download the image from the local registry.
Pull Image from Local Registry:
To pull an image from your local Docker Registry, use the docker pull command with the full registry URL and image name.
localhost:~$ docker pull localhost:5000/redis:latest
latest: Pulling from redis
33847f680f63: Already exists
26a746039521: Pull complete
18d87da94363: Pull complete
5e118a708802: Pull complete
ecf0dbe7c357: Pull complete
46f280ba52da: Pull complete
Digest: sha256:1bd57e1a42b99ae53412b582784d0362fa8205243ce5f289cb4f76de2907cb97
Status: Downloaded newer image for localhost:5000/redis:latest
localhost:5000/redis:latest
We can Replace localhost:5000/redis:latest with the appropriate registry URL, image name, and tag that you used when pushing the Redis image to your local registry.
Note — A point to note here is that docker only allows secure registry which are secured using TLS with the exception of localhost.
Docker by default requires secure connections (TLS) for accessing Docker registries, except for registries accessed locally via localhost. This security measure helps protect sensitive data and ensures that communication between Docker clients and registries is encrypted and authenticated.
When Docker clients communicate with a Docker registry over a network (e.g., Docker Hub, private registries hosted on remote servers), the registry URL must use the HTTPS protocol (https://) and have a valid TLS certificate. This ensures that data transferred between the client and registry is secure and protected against unauthorized access or tampering.
To check this let us tag another image to the IP allotted to our local machine.
For example, to tag an image named myimage with tag latest to the IP address 192.168.1.100 and port 5000, you would use:
localhost:~$ docker tag myimage:latest 192.168.1.100:5000/myimage:latest
Push or Use the Tagged Image:
you’re encountering an error when trying to push an image to a Docker registry using HTTP instead of HTTPS. Docker requires secure connections (HTTPS) for interacting with remote registries by default to ensure data security and integrity.
localhost:~$ docker image push 192.168.1.100:5000/myimage:latest
Using default tag: latest
The push refers to repository [192.168.1.100:5000/myimage:latest]
Get https://192.168.1.100:5000/v2/: http: server gave HTTP response to HTTPS client
To resolve this issue and push your image to a Docker registry, you’ll need to use HTTPS instead of HTTP in the registry URL. Here’s how you can do it:
To allow get the docker to allow insecure location, we need to modify docker configuration to allow insecure registries or locations, including specific IPs, you need to create or edit the daemon.json file. This file is typically located in /etc/docker/ directory on Linux systems. Here's how you can create the daemon.json file and specify insecure registries or IP addresses:
localhost:~$ cd /etc/docker/
Use a text editor (e.g., nano, vi, vim) to create or edit the daemon.json file
localhost:~$ vi daemon.json
Inside the daemon.json file, add a JSON configuration to specify the insecure registry or IP address that Docker should allow connections to.
{
    "insecure-registries": ["192.168.1.100:5000"]
}
After adding the configuration, save the changes and close the text editor.
vi or vim: Press Esc to exit editing mode, then type :wq to save and quit, and press Enter
Restart Docker Daemon:
After modifying the daemon.json file, restart the Docker daemon to apply the changes:
localhost:~$ sudo systemctl restart docker
Now Start the Containers
localhost:~$ docker container ls -a
CONTAINER ID   IMAGE      COMMAND                  CREATED          STATUS                          PORTS     NAMES
e3835d2ab35d   registry   "/entrypoint.sh /etc…"   32 minutes ago   Exited (2) About a minute ago            my_registry

localhost:~$ docker container start e38
e38
Push the Tagged Image to Insecure Registry:
you can push it to the registry using the docker push command.
localhost:~$ docker push 192.168.1.100:5000/myimage:latest

Using default tag: latest
The push refers to repository [192.168.1.100:5000/myimage:latest]
262de04acb7e: Layer already exists
45f6df634253: Layer already exists
e46136075591: Layer already exists
11f991845040: Layer already exists
dd1ebb1f5319: Layer already exists
814bff734324: Layer already exists
latest: digest: sha256:1bd57e1a42b99ae53412b582784d0362fa8205243ce5f289cb4f76de2907cb97 size: 1574
After pushing the image, you can verify that it was successfully pushed to the insecure registry by checking the output of the
docker pushcommand or using the Docker CLI to list images in the registry.Additionally, you can verify the image’s presence in the insecure registry by inspecting the registry’s catalog or using Docker commands specific to managing images in the registry.
👉 Docker Registry/Repository (Secure)
For making our registry secure we will need certificates. So let’s create a directory first to store those certificates. And then we will generate self-signed certificates using OpenSSL.
Here’s how you can create a directory to store certificates and generate self-signed certificates using OpenSSL for securing your Docker registry:
Create a Directory for Certificates:
Create a directory to store your certificates. You can choose a suitable location, such as /etc/docker/certs/:
localhost:~$ mkdir -p /etc/docker/certs/
Navigate to the newly created directory:
localhost:~$ cd /etc/docker/certs/
Generate Self-Signed Certificates with OpenSSL:
Use OpenSSL to generate a private key and a self-signed certificate for your Docker registry. Replace registry.example.com with your registry's domain name or IP address:
localhost: openssl req -newkey rsa:4096 -nodes -sha256 -keyout certs/domain.key -x509 -days 365 -out certs/domain.crt
The command you provided generates a self-signed SSL certificate using OpenSSL with the following options:
req: Indicates that this command is for creating a new certificate signing request (CSR) and a new private key.-newkey rsa:4096: Specifies the type of key to be generated (rsa:4096indicates an RSA key with a key length of 4096 bits).-nodes: Specifies that the private key should not be encrypted with a passphrase (this is not recommended for production environments but can be useful for testing or development).-sha256: Specifies the hashing algorithm to use for the certificate signing request (CSR) and the self-signed certificate. In this case, SHA-256 will be used.-keyout certs/domain.key: Specifies the output file (domain.key) for the private key.-x509: Specifies that a self-signed certificate should be generated (as opposed to a certificate signing request for submission to a certificate authority).-days 365: Specifies the validity period of the self-signed certificate in days (365 days in this case).-out certs/domain.crt: Specifies the output file (domain.crt) for the self-signed certificate.
After running this command, you will have two files in the certs/ directory:
domain.key: The private key file (not encrypted in this case due to the-nodesoption).domain.crt: The self-signed SSL certificate file.
We need to copy the generated self-signed SSL certificate (domain.crt) to the specified path (/etc/docker/certs.d/repo.docker.local:5000/ca.crt), you can use the cp command in the terminal. Here's how you can do it:
First, create the directory structure required by Docker for storing SSL certificates.
localhost:~/certs$ ls
domain.crt  domain.key

localhost:~/certs$ cd /etc/docker/
localhost:/etc/docker$ mkdir certs.d

localhost:/etc/docker$ cd certs.d/
localhost:/etc/docker/certs.d$ sudo mkdir repo.docker.local:5000
Next, copy the generated self-signed certificate (domain.crt) to the appropriate directory and rename it as ca.crt (the naming convention Docker expects for the CA certificate).
localhost:/home/certs# cp domain.crt /etc/docker/certs.d/repo.docker.local:5000/ca.crt
After copying the certificate we need to restart the docker service.
localhost:~# systemctl restart docker
And we also need to run the registry again using the command in the below image.
localhost:~# docker container run -d -p 5000:5000 --name secure_registry -v /home/certs/:/certs -e REGISTRY_HTTP_TLS_CERTIFICATE=/certs/domain.crt -e REGISTRY_HTTP_TLS_KEY=/certs/domain.key registry
9f4a4f911259672c1f1fe31195e17914f355c383d496c79ec68e2d79ef4d0922

localhost:~# docker container ls
CONTAINER ID   IMAGE      COMMAND                  CREATED         STATUS         PORTS                    NAMES
9f4a4f911259   registry   "/entrypoint.sh /etc…"   5 seconds ago   Up 4 seconds   0.0.0.0:5000->5000/tcp   secure_registry

localhost:~#
In the above command we are running the container named secure_registry along with that we have provided parameters to map the port, using -v flag we are mounting the certificate present in /home/certs directory to the certs folder inside the container and we are passing environment variables using -e flag for passing the path to the self-signed certificate and the generated key present inside the container.
So our registry is up and running now.
Let’s try to push an image to the registry again to the insecure registry. This gives an error message.
localhost:~# docker image push 192.168.1.100:5000/myimage:latest

Using default tag: latest
The push refers to repository [192.168.1.100:5000/myimage:latest]
Get https://192.168.1.100:5000/v2/: x509: cannot validate certificate for 192.168.1.100 because it doesnt contain any IP SANs

localhost:~#
Now let’s try to push an image to the domain name ‘repo.docker.local’ for which we generated the self-signed certificate.
localhost:~# docker image tag redis repo.docker.local:5000/myimage:latest

localhost:~# docker image push repo.docker.local:5000/myimage:latest
Using default tag: latest
The push refers to repository [repo.docker.local:5000/myimage:latest]
Get https://repo.docker.local:5000/v2/: dial tcp: lookup repo.docker.local: Temporary failure in name resolution

localhost:~#
But again on trying to push this image we get an error which says docker is unable to resolve this domain name.
To resolve the issue of Docker being unable to resolve the domain name repo.docker.local, you can indeed add an entry to your /etc/hosts file. This step is particularly useful for testing and development environments where you want to map domain names to specific IP addresses manually. Here's how you can do it:
Add a new line at the end of the file to map repo.docker.local to the correct IP address. Replace <IP-address> with the actual IP address of your Docker registry:
localhost:~# cat /etc/hosts
192.168.1.100 repo.docker.local
Save the changes to the /etc/hosts file and exit the text editor.
After updating the hosts file, restart the Docker service to apply the changes:
localhost:~# systemctl restart docker
Now let’s again try to push the image.
localhost:~# docker image push repo.docker.local:5000/myimage:latest

Using default tag: latest
The push refers to repository [repo.docker.local:5000/myimage:latest]
262de04acb7e: Pushed
45f6df634253: Pushed
e46136075591: Pushed
11f991845040: Pushed
dd1ebb1f5319: Pushed
814bff734324: Pushed
latest: digest: sha256:1bd57e1a42b99ae53412b582784d0362fa8205243ce5f289cb4f76de2907cb97 size: 1574

localhost:~#
The image is pushed and we have set up our secure register successfully!