IPvlan network driver

👋 Hi there! I'm a DevOps enthusiast with a deep passion for all things Cloud Native. I thrive on learning and exploring new technologies, always eager to expand my knowledge and skills. Let's connect, collaborate, and grow together as we navigate the ever-evolving tech landscape! SKILLS: 🔹 Languages & Runtimes: Python, Shell Scripting, YAML 🔹 Cloud Technologies: AWS, Microsoft Azure, GCP 🔹 Infrastructure Tools: Docker, Terraform, AWS CloudFormation 🔹 Other Tools: Linux, Git and GitHub, Jenkins, Docker, Kubernetes, Ansible, Prometheus, Grafana
The IPvlan network driver in Docker is a type of network driver that provides network isolation and allows containers to have their own MAC and IP addresses on a network. It operates at Layer 2 of the OSI model and enables containers to communicate directly with the physical network, bypassing the host’s networking stack.
The IPvlan network driver in Docker provides users with extensive control over IPv4 and IPv6 addressing within containers. It allows for the creation of isolated network segments with their own MAC and IP addresses, enhancing network security and segmentation capabilities.
The IPvlan driver gives users total control over both IPv4 and IPv6 addressing. The VLAN driver builds on top of that in giving operators complete control of layer 2 VLAN tagging and even IPvlan L3 routing for users interested in underlay network integration.
IPvlan is a new twist on the tried and true network virtualization technique. The Linux implementations are extremely lightweight because rather than using the traditional Linux bridge for isolation, they are associated to a Linux Ethernet interface or sub-interface to enforce separation between networks and connectivity to the physical network.
IPvlan offers a number of unique features and plenty of room for further innovations with the various modes. Two high level advantages of these approaches are, the positive performance implications of bypassing the Linux bridge and the simplicity of having fewer moving parts. Removing the bridge that traditionally resides in between the Docker host NIC and container interface leaves a simple setup consisting of container interfaces, attached directly to the Docker host interface. This result is easy to access for external facing services as there is no need for port mappings in these scenarios.
The following table describes the driver-specific options that you can pass to --option when creating a network using the ipvlan driver.
ipvlan_mode: Sets the IPvlan operating mode. Can be one of: l2, l3, l3s
ipvlan_flag: Sets the IPvlan mode flag. Can be one of: bridge, private, vepa
parent: Specifies the parent interface to use.
👉Kernel requirements:
IPvlan Linux kernel v4.2+ (support for earlier kernels exists but is buggy). To check your current kernel version, use uname -r
👉 Example:
The driver is specified with -d driver_name option. In this case -d ipvlan.
The parent interface in the next example -o parent=eth0 is configured as follows:
ip addr show eth0
3: eth0: <BROADCAST,MULTICAST,UP,LOWER_UP> mtu 1500 qdisc pfifo_fast state UP group default qlen 1000
    inet 192.168.1.250/24 brd 192.168.1.255 scope global eth0
Use the network from the host's interface as the --subnet in the docker network create. The container will be attached to the same network as the host interface as set via the -o parent= option.
Create the IPvlan network and run a container attaching to it:
# # IPvlan (-o ipvlan_mode= Defaults to L2 mode if not specified)
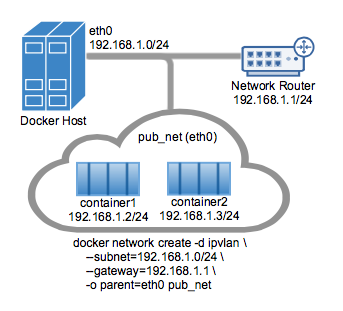
docker network create -d ipvlan \
--subnet=192.168.1.0/24 \
--gateway=192.168.1.1 \
-o ipvlan_mode=l2 \
-o parent=eth0 db_net
# Start a container on the db_net network
docker run --net=db_net -it --rm alpine /bin/sh
# NOTE: the containers can NOT ping the underlying host interfaces as
# they are intentionally filtered by Linux for additional isolation.
The default mode for IPvlan is l2. If -o ipvlan_mode= is left unspecified, the default mode will be used. Similarly, if the --gateway is left empty, the first usable address on the network will be set as the gateway. For example, if the subnet provided in the network create is --subnet=192.168.1.0/24 then the gateway the container receives is 192.168.1.1.
The following will create the exact same network as the network db_net created earlier, with the driver defaults for --gateway=192.168.1.1 and -o ipvlan_mode=l2.
# # IPvlan  (-o ipvlan_mode= Defaults to L2 mode if not specified)
docker network create -d ipvlan \
    --subnet=192.168.1.0/24 \
    -o parent=eth0 db_net_ipv

# Start a container with an explicit name in daemon mode
docker run --net=db_net_ipv --name=ipv1 -itd alpine /bin/sh

# Start a second container and ping using the container name
# to see the docker included name resolution functionality
docker run --net=db_net_ipv --name=ipv2 -it --rm alpine /bin/sh
ping -c 4 ipv1

# NOTE: the containers can NOT ping the underlying host interfaces as
# they are intentionally filtered by Linux for additional isolation.
The drivers also support the --internal flag that will completely isolate containers on a network from any communications external to that network. Since network isolation is tightly coupled to the network's parent interface the result of leaving the -o parent= option off of a docker network create is the exact same as the --internal option. If the parent interface is not specified or the --internal flag is used, a netlink type dummy parent interface is created for the user and used as the parent interface effectively isolating the network completely.
👉 In Other Example:
To create an IPvlan network in Docker, you can use the docker network create command with the -d ipvlan option. Below is an example command to create an IPvlan network:
docker network create -d ipvlan --subnet=192.168.1.0/24 --gateway=192.168.1.1 -o parent=eth0 my_ipvlan_network
Let’s break down the components of this command:
docker network create: This part of the command instructs Docker to create a new network.-d ipvlan: Specifies that the network driver to be used is IPvlan.--subnet=192.168.1.0/24: Defines the subnet range for the IPvlan network. You can adjust this subnet range as needed for your network configuration.--gateway=192.168.1.1: Specifies the gateway IP address for the IPvlan network. Replace192.168.1.1with your desired gateway IP.-o parent=eth0: Indicates the parent interface (physical interface) to which the IPvlan network will be attached. Replaceeth0with the appropriate interface name on your host machine.my_ipvlan_network: Assigns the namemy_ipvlan_networkto the IPvlan network. You can choose a different name if desired.
After running the above command, Docker will create an IPvlan network named my_ipvlan_network with the specified subnet, gateway, and parent interface.
If you want to run a container and attach it to the IPvlan network you created (my_ipvlan_network), you can use the docker run command with the --network=my_ipvlan_network option:
docker run -d --network=my_ipvlan_network --name my_container nginx
Let’s break down the components of this command:
docker run: This part of the command instructs Docker to run a new container.-d: Runs the container in detached mode (background).--network=my_ipvlan_network: Specifies that the container should be attached to themy_ipvlan_networkIPvlan network that you created.--name my_container: Assigns the namemy_containerto the Docker container. You can replacemy_containerwith your desired container name.nginx: Specifies the Docker image to use for the container, in this case
After running the above command, Docker will create a new container named my_container and attach it to the my_ipvlan_network IPvlan network.
To verify that the container is running and attached to the IPvlan network, you can use the docker ps command to check the container's status and the network it's connected to.
docker ps
you should see it listed in the output of docker ps:
CONTAINER ID   IMAGE    COMMAND                  CREATED          STATUS         PORTS     NAMES
123456789abc   nginx    "nginx -g 'daemon of…"   1 minute ago    Up 1 minute             my_container


