Macvlan network driver

👋 Hi there! I'm a DevOps enthusiast with a deep passion for all things Cloud Native. I thrive on learning and exploring new technologies, always eager to expand my knowledge and skills. Let's connect, collaborate, and grow together as we navigate the ever-evolving tech landscape! SKILLS: 🔹 Languages & Runtimes: Python, Shell Scripting, YAML 🔹 Cloud Technologies: AWS, Microsoft Azure, GCP 🔹 Infrastructure Tools: Docker, Terraform, AWS CloudFormation 🔹 Other Tools: Linux, Git and GitHub, Jenkins, Docker, Kubernetes, Ansible, Prometheus, Grafana
Macvlan network is used to connect applications directly to the physical network. By using the macvlan network driver to assign a MAC address to each container, also allow having full TCP/Ip stack. Then, the Docker daemon routes traffic to containers by their MAC addresses. You can isolate your macvlan networks using different physical network interfaces. This is used in legacy applications which require MAC address.
Macvlan networking in Docker is a mode that gives each container its own MAC address, making them appear as separate physical devices on the network. This enables containers to directly communicate with external networks without going through the Docker host’s network stack. Macvlan networking is beneficial for scenarios where containers require direct access to the underlying network infrastructure, such as when running network-intensive applications or services that need to expose specific ports. It provides improved network performance, isolation, and flexibility compared to bridge networking, making it suitable for applications needing container-to-network communication without network address translation (NAT) overhead.
For example some applications, especially legacy applications or applications which monitor network traffic, expect to be directly connected to the physical network. In this type of situation, you can use the macvlan network driver to assign a MAC address to each container's virtual network interface, making it appear to be a physical network interface directly connected to the physical network. In this case, you need to designate a physical interface on your Docker host to use for the Macvlan, as well as the subnet and gateway of the network. You can even isolate your Macvlan networks using different physical network interfaces.
Keep the following things in mind:
You may unintentionally degrade your network due to IP address exhaustion or to “VLAN spread”, a situation that occurs when you have an inappropriately large number of unique MAC addresses in your network.
Your networking equipment needs to be able to handle “promiscuous mode”, where one physical interface can be assigned multiple MAC addresses.
If your application can work using a bridge (on a single Docker host) or overlay (to communicate across multiple Docker hosts), these solutions may be better in the long term.
👉 Use case of Macvlan network:
Network Appliances: Macvlan is commonly used when running network appliances or virtual network devices within containers. For example, you might have a containerized firewall, load balancer, or VPN server that needs to interact with the external network as if it were a physical appliance.
Virtual Routers: In networking setups where virtual routers are utilized for routing traffic between different networks or VLANs, Macvlan can be used to create containers that act as virtual routers. These containers can have their own MAC and IP addresses and route traffic between various network segments.
Containerized Servers: For applications that require direct access to network hardware or external resources, Macvlan can provide containers with dedicated MAC addresses and IP addresses on the same subnet as the host or on a separate subnet. This allows the containers to communicate directly with external servers, devices, or services without network address translation (NAT) overhead.
Multi-Tenant Environments: In multi-tenant environments where different users or applications require separate network identities and isolation, Macvlan can be used to create individual networks for each tenant. This ensures that containers belonging to different tenants operate as independent entities on the network.
Testing and Development: Macvlan networks are also useful for testing and development environments where you want containers to behave as if they were physical machines on the network. This can be beneficial for simulating real-world network configurations and scenarios.
Media Streaming and Broadcasting: Applications that involve media streaming, broadcasting, or multicast communication can benefit from Macvlan networks to ensure efficient and direct communication with network hardware and services.
The following table describes the driver-specific options that you can pass to --option when creating a network using the macvlan driver.
macvlan_mode: Sets the Macvlan mode. Can be one of: bridge, vepa, passthru, private
parent: Specifies the parent interface to use.
👉 Prerequisites
Most cloud providers block
macvlannetworking. You may need physical access to your networking equipment.The
macvlannetworking driver only works on Linux hosts, and is not supported on Docker Desktop for Mac, Docker Desktop for Windows, or Docker EE for Windows Server.You need at least version 3.9 of the Linux kernel, and version 4.0 or higher is recommended.
The examples assume your ethernet interface is
eth0. If your device has a different name, use that instead.The
macvlandriver is not supported in rootless mode.
👉 Create a Macvlan network
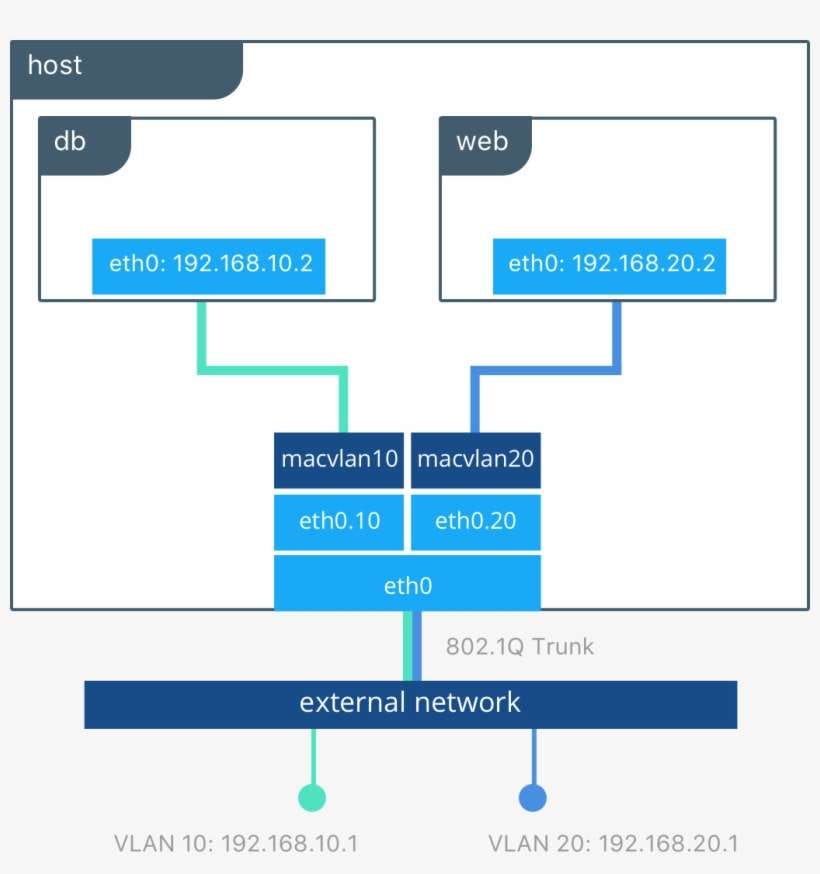
When you create a Macvlan network, it can either be in bridge mode or 802.1Q trunk bridge mode.
In bridge mode, Macvlan traffic goes through a physical device on the host.
In 802.1Q trunk bridge mode, traffic goes through an 802.1Q sub-interface which Docker creates on the fly. This allows you to control routing and filtering at a more granular level.
Bridge mode example:
In our example, we have a physical network interface eth0 on the 172.16.86.0/24 network and the default gateway of 172.16.86.1 The default gateway is the IP address of the router.
Now, we will create a macvlan network called my-macvlan-net with the following configuration.
To create a macvlan network which bridges with a given physical network interface, use --driver macvlan with the docker network create command. You also need to specify the parent, which is the interface the traffic will physically go through on the Docker host.
$ docker network create -d macvlan \
  --subnet=172.16.86.0/24 \
  --gateway=172.16.86.1 \
  -o parent=eth0 \
  my-macvlan-net
Let’s break down the components of this command:
docker network create: This part of the command instructs Docker to create a new network.-d macvlan: Specifies that the network driver to be used is Macvlan.--subnet=172.168.86.0/24: Defines the subnet range for the Macvlan network. You can adjust this subnet range as needed for your network configuration.--gateway=172.16.86.1: Specifies the gateway IP address for the Macvlan network. Replace172.16.86.1with your desired gateway IP.-o parent=eth0: Indicates the parent interface (physical interface) to which the Macvlan network will be attached. Replaceeth0with the appropriate interface name on your host machine.my-macvlan-net: Assigns the namemy-macvlan-netto the Macvlan network. You can choose a different name if desired.
If you need to exclude IP addresses from being used in the macvlan network, such as when a given IP address is already in use, use --aux-addresses:
$ docker network create -d macvlan \
  --subnet=192.168.32.0/24 \
  --ip-range=192.168.32.128/25 \
  --gateway=192.168.32.254 \
  --aux-address="my-router=192.168.32.129" \
  -o parent=eth0 macnet32
To confirm that the newly added macvlan network is present, run the command:
$ docker network ls
When you run this command, Docker will display a list of networks along with their IDs, names, driver types, and other details. Look for your Macvlan network in the list to confirm its presence.
$ NETWORK ID     NAME               DRIVER    SCOPE
abcdef123456   bridge             bridge    local
ghijkl789012   host               host      local
mnopqr345678   none               null      local
xyz123456789   my-macvlan-net     macvlan   local
In this example output:NETWORK ID: Unique identifier for the network.
NAME: Name of the network (my-macvlan-netin this case).DRIVER: Network driver used for the network (Macvlan in this case).SCOPE: Indicates the scope of the network (local means it's local to the Docker host).
Start an container and attach it to the my-macvlan-net network. The -dit flags start the container in the background but allow you to attach to it. The --rm flag means the container is removed when it is stopped.
$ docker run --rm -dit \
  --network my-macvlan-net \
  --name my_container \
  alpine:latest \
  ash
Let’s break down this command:
docker run: This command is used to create and start a new container.-d: Runs the container in detached mode (background).--network= my-macvlan-net: Specifies that the container should be attached to themy-macvlan-netMacvlan network that you created earlier.--name my_container: Assigns the namemy_containerto the Docker container. You can replacemy_containerwith your desired container name.nginx: Specifies the Docker image to use for the container. In this example, we're using the Nginx image. Replacenginxwith the image name you want to use.
The container will run in the background, and you can verify its status using docker ps.
$ docker ps
When you run docker ps, Docker will display a list of all running containers along with their container IDs, names, statuses, ports, and other information. Look for your container in the list to ensure it's running and verify its network configuration.
CONTAINER ID       IMAGE       COMMAND            CREATED         STATUS       PORTS      NAMES
5e3ec79625d388       nginx      "/bin/bash"       1 minute ago     Up 1 minute             my_container
Inspect the my_container container and notice the MacAddress key within the Networks key:
$ docker container inspect my_container

...truncated...
"Networks": {
  "my-macvlan-net": {
      "IPAMConfig": null,
      "Links": null,
      "Aliases": [
          "bec64291cd4c"
      ],
      "NetworkID": "5e3ec79625d388dbcc03dcf4a6dc4548644eb99d58864cf8eee2252dcfc0cc9f",
      "EndpointID": "8caf93c862b22f379b60515975acf96f7b54b7cf0ba0fb4a33cf18ae9e5c1d89",
      "Gateway": "172.16.86.1",
      "IPAddress": "172.16.86.2",
      "IPPrefixLen": 24,
      "IPv6Gateway": "",
      "GlobalIPv6Address": "",
      "GlobalIPv6PrefixLen": 0,
      "MacAddress": "02:42:ac:10:56:02",
      "DriverOpts": null
  }
}
...truncated
Check out how the container sees its own network interfaces by running a couple of docker exec commands.
$ docker exec my_container ip addr show eth0

9: eth0@tunl0: <BROADCAST,MULTICAST,UP,LOWER_UP,M-DOWN> mtu 1500 qdisc noqueue state UP
link/ether 02:42:ac:10:56:02 brd ff:ff:ff:ff:ff:ff
inet 172.16.86.2/24 brd 172.16.86.255 scope global eth0
   valid_lft forever preferred_lft forever
$ docker exec my_container ip route

default via 172.16.86.1 dev eth0
172.16.86.0/24 dev eth0 scope link  src 172.16.86.2
Stop the container (Docker removes it because of the --rm flag), and remove the network.
$ docker container stop my_container

$ docker network rm my-macvlan-net
802.1Q trunked bridge example:
In the 802.1Q trunked bridge example, your traffic flows through a sub-interface of eth0 (called eth0.10) and Docker routes traffic to your container using its MAC address. To network devices on your network, your container appears to be physically attached to the network.
Create a macvlan network called my-8021q-macvlan-net. Modify the subnet, gateway, and parent values to values that make sense in your environment.
$ docker network create -d macvlan \
  --subnet=172.16.86.0/24 \
  --gateway=172.16.86.1 \
  -o parent=eth0.10 \
  my-8021q-macvlan-net
You can use docker network ls and docker network inspect my-8021q-macvlan-net commands to verify that the network exists, is a macvlan network, and has parent eth0.10. You can use ip addr show on the Docker host to verify that the interface eth0.10 exists and has a separate IP address.
Start an alpine container and attach it to the my-8021q-macvlan-net network. The -dit flags start the container in the background but allow you to attach to it. The --rm flag means the container is removed when it is stopped.
$ docker run --rm -itd \
  --network my-8021q-macvlan-net \
  --name my-second-macvlan-alpine \
  alpine:latest \
  ash
Inspect the my-second-macvlan-alpine container and notice the MacAddress key within the Networks key:
$ docker container inspect my-second-macvlan-alpine

...truncated...
"Networks": {
  "my-8021q-macvlan-net": {
      "IPAMConfig": null,
      "Links": null,
      "Aliases": [
          "12f5c3c9ba5c"
      ],
      "NetworkID": "c6203997842e654dd5086abb1133b7e6df627784fec063afcbee5893b2bb64db",
      "EndpointID": "aa08d9aa2353c68e8d2ae0bf0e11ed426ea31ed0dd71c868d22ed0dcf9fc8ae6",
      "Gateway": "172.16.86.1",
      "IPAddress": "172.16.86.2",
      "IPPrefixLen": 24,
      "IPv6Gateway": "",
      "GlobalIPv6Address": "",
      "GlobalIPv6PrefixLen": 0,
      "MacAddress": "02:42:ac:10:56:02",
      "DriverOpts": null
  }
}
...truncated
Check out how the container sees its own network interfaces by running a couple of docker exec commands.
$ docker exec my-second-macvlan-alpine ip addr show eth0

11: eth0@if10: <BROADCAST,MULTICAST,UP,LOWER_UP,M-DOWN> mtu 1500 qdisc noqueue state UP
link/ether 02:42:ac:10:56:02 brd ff:ff:ff:ff:ff:ff
inet 172.16.86.2/24 brd 172.16.86.255 scope global eth0
   valid_lft forever preferred_lft forever
$ docker exec my-second-macvlan-alpine ip route

default via 172.16.86.1 dev eth0
172.16.86.0/24 dev eth0 scope link  src 172.16.86.2
Stop the container (Docker removes it because of the --rm flag), and remove the network.
$ docker container stop my-second-macvlan-alpine

$ docker network rm my-8021q-macvlan-net


