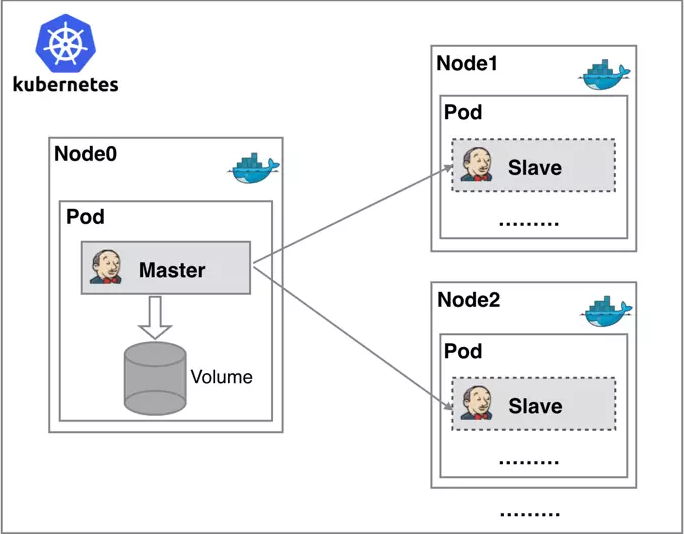
We will Deploy a Kubernetes cluster on the AWS public cloud, utilizing EC2 instances for infrastructure.
The setup will include a single master node to manage the cluster and two worker nodes to handle application workloads. These nodes will be provisioned on EC2 instances with appropriate configurations to support Kubernetes operations.
This architecture will enable us to orchestrate containerized applications effectively, leveraging AWS’s scalability and reliability.

Step 1: Prerequisites
AWS Account: Ensure you have an active AWS account.
kubectl: Install the
kubectlCLI tool to interact with the Kubernetes cluster.Docker: Ensure Docker is installed on all nodes (Master and Workers).
Kubeadm: Install
kubeadm,kubelet, andkubectlon all nodes.
Step 2: Launch EC2 Instances
We need to logging into your AWS Management Console and navigating to the EC2 (Elastic Compute Cloud) dashboard. Here, launch three EC2 instances to serve as the nodes in your Kubernetes cluster.
Ensure that you select the appropriate instance types and sizes based on your workload requirements, and allocate sufficient resources for each node, including CPU, memory, and storage. Choose the AMI of RHEL9.2
I Choose an instance of type t2.medium for master and of type t2.micro for worker nodes. and Configure security groups to allow SSH (port 22), Kubernetes API Server (port 6443), and allow the All traffic in the security group other necessary ports.

Step 3: Install Dependencies On all instances (Master and Workers):
Update System:
sudo apt-get update -y
Install Docker:
Before you install Docker Engine for the first time on a new host machine, you need to set up the Docker apt repository. Afterward, you can install and update Docker from the repository.
# Add Docker's official GPG key:
sudo apt-get install ca-certificates curl
sudo install -m 0755 -d /etc/apt/keyrings
sudo curl -fsSL https://download.docker.com/linux/ubuntu/gpg -o /etc/apt/keyrings/docker.asc
sudo chmod a+r /etc/apt/keyrings/docker.asc

# Add the repository to Apt sources:
echo \
  "deb [arch=$(dpkg --print-architecture) signed-by=/etc/apt/keyrings/docker.asc] https://download.docker.com/linux/ubuntu \
  $(. /etc/os-release && echo "$VERSION_CODENAME") stable" | \
  sudo tee /etc/apt/sources.list.d/docker.list > /dev/null
sudo apt-get update
Install the Docker packages:
sudo apt-get install docker-ce docker-ce-cli containerd.io docker-buildx-plugin docker-compose-plugin
Verify that the installation is successful by running:
docker --version
To start docker on the node:
sudo systemctl start docker
To enable docker on the node:
sudo systemctl enable docker
To check docker status:
sudo systemctl status docker
Step 4: Install Kubernetes Tools:
Once the docker is installed, the next step is to install Kubernetes tools on all three machines.
Update the apt package index :
sudo apt-get update -y
Install packages needed to use the Kubernetes apt repository:
# apt-transport-https may be a dummy package; if so, you can skip that package

sudo apt-get install -y apt-transport-https ca-certificates curl -y
Download the public signing key for the Kubernetes package repositories. The same signing key is used for all repositories so you can disregard the version in the URL:
# If the directory `/etc/apt/keyrings` does not exist, it should be created before the curl command, read the note below.

# sudo mkdir -p -m 755 /etc/apt/keyrings

curl -fsSL https://pkgs.k8s.io/core:/stable:/v1.31/deb/Release.key | sudo gpg --dearmor -o /etc/apt/keyrings/kubernetes-apt-keyring.gpg
Add the appropriate Kubernetes apt repository.
Please note that this repository have packages only for Kubernetes 1.31; for other Kubernetes minor versions, you need to change the Kubernetes minor version in the URL to match your desired minor version (you should also check that you are reading the documentation for the version of Kubernetes that you plan to install).
# This overwrites any existing configuration in /etc/apt/sources.list.d/kubernetes.list
echo 'deb [signed-by=/etc/apt/keyrings/kubernetes-apt-keyring.gpg] https://pkgs.k8s.io/core:/stable:/v1.31/deb/ /' | sudo tee /etc/apt/sources.list.d/kubernetes.list
OR
sudo curl -fsSL https://packages.cloud.google.com/apt/doc/apt-key.gpg | sudo apt-key add -

To disable swap temporary (as recommended):
sudo swapoff -a
Update the apt package index, install kubelet, kubeadm and kubectl, and pin their version:
sudo apt-get update
sudo apt-get install -y kubelet kubeadm kubectl
Verification Installation:
Kubectl --version
kubeadm version
(Optional) Enable the kubelet service before running kubeadm:
sudo systemctl enable --now kubelet
Step 5: Configure Kubernetes Master Node
The next step of Kubernetes cluster configuration is to initialize Kubernetes on the master node using the kubeadm init command. It should be successful.
sudo kubeadm init --pod-network-cidr=172.168.0.0/16
Step 6: Set Up Kubeconfig:
To set up the kubeconfig, I need to execute the below set of commands on the master as well as on the client machine.
mkdir -p $HOME/.kube
sudo cp -i /etc/kubernetes/admin.conf $HOME/.kube/config
sudo chown $(id -u):$(id -g) $HOME/.kube/config
Install a Pod Network (e.g., Calico):
To install Calico, you need to apply a manifest file that contains the necessary configurations for Calico’s components. Run the following command on the Master Node:
kubectl apply -f https://docs.projectcalico.org/manifests/calico.yaml
This command:
Downloads the YAML file from the Calico documentation.
Deploys the required components, including:
Calico Node: Runs on each node and implements networking and policy enforcement.
Felix: Handles network routing and implements security policies.
Typha (optional): Optimizes cluster communication for large deployments.
Step 7: Join Worker Nodes:
Run the kubeadm join command from the Master Node initialization output:
sudo kubeadm join 172.168.1.100:6443 --token abcdef.0123456789abcdef --discovery-token-ca-cert-hash sha256:3b6f29d7c2b571ef6f94743e34a918bb8ed745c43f8dc0c9c1b7b5c83a26772e
Step 8: Verifying the Cluster:
Ensure all nodes (Master and Workers) are registered and in the Ready state.
kubectl get nodes
Expected Output:
NAME                STATUS   ROLES           AGE   VERSION
master-node         Ready    control-plane   10m   v1.28.1
worker-node-1       Ready    <none>          5m    v1.28.1
worker-node-2       Ready    <none>          5m    v1.28.1
Check System Pods:
Verify that all system Pods in the kube-system namespace are running.
kubectl get pods -n kube-system
Expected Output:
NAME                                       READY   STATUS    RESTARTS   AGE
coredns-6955765f44-2fj4j                   1/1     Running   0          10m
coredns-6955765f44-rlfhz                   1/1     Running   0          10m
etcd-master-node                           1/1     Running   0          10m
kube-apiserver-master-node                 1/1     Running   0          10m
kube-controller-manager-master-node        1/1     Running   0          10m
kube-proxy-abcdef                          1/1     Running   0          5m
calico-node-xyz123                         1/1     Running   0          8m
